Monday, 19 November 2012

Engine Rebuild

19th November
Its been almost a month since my last post.  Things have moved on quite a lot.

Started re-building the engine.  Replaced the pushrod tubes, new tinware, and a lot of cleaning.


The engine came with a DRLA 36D carb.  The engine is a 1776cc, it runs great but doesn't idle well.  I think we will have to strip it down and check everything is good, but not yet.  We really wanted to get it set up and run it for a while to make sure we had a good engine.


Heres the front end all done.  The lowest point is 100mm (4") off the floor, this is the maximum height available as well.  This was achieved with dropped spindles, beam adjusters and Bugpack lowered shocks.


Disc brakes fitted to the rear, replaced the gearbox seals, heat exchangers cleaned and painted in high temp paint.


 The completed running gear.  Next jobs fit pedals, make and fit new brake lines then onto the body.


Front Beam


16th October
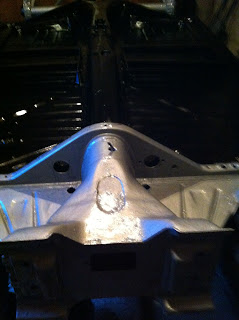
Complete disaster.  Turned the floor pan right side up, and started looking at tiny bits of reaction of the KBS coating on the frame head.  One thing lead to another and in an attempt to investigate, I ended up taking the entire coating off.


Even though the 3 step process was followed to the letter, the coating has not bonded to the metal at all, and although there was no surface rust before, surface rust was found under the paint.


So the Rust blast obviously didn't work, and the rust seal paint didn't bond.  The big question is what to do with the entire floor pan?  Do I strip it off now or hope that it has bonded better.

I have checked the pan, and at the minute I have left it as is.  See below a photo of the front end now re-sprayed in Hammerite and rebuilt front beam fitted.


The steering box came up pretty good after a good clean.


Sunday, 14 October 2012

Painting the Floorpan


14th October 2012
No rest for the wicked, its time to turn the pan over and start wire brushing again.


With the pan bear, I gave it a a good clean with Thinners then masked up and applied seam sealant.  Once this had dried, I applied the KBS Aqua Clean.
 
Once washed off, a treatment of rust blast, and then when completely dry the Rust Seal paint.
 
One coat of Rust seal on.  Applied with a brush, the finish was  a little streaky in colour.  Applied the next two coats with a gloss roller and the finish was great.
However, I wanted to make doubly sure so applied 2 spray coats of hammerite over the top within 2 hours of applying the Rust seal.
 
I am completely amazed by the finish.  This will be the finished surface, no underseal, waxoyl or anything.  Just a shiny silver floor with everything attached to it in black.
Next, the jobs I have been waiting for, stripping/cleaning and painting all of the suspension parts ready to re-fit and get this chassis rolling again.


Monday, 8 October 2012

Floor pan modifications

6th October 2012
Prior to painting the chassis, i wanted to get all of the mods to the floor completed.  These included:

  1. Fit original seat frames.
  2. Fit seat frame mods to accept 1970 porsche seats.
  3. Add brackets and holes for RHD pedal conversion.
  4. Cut seat belt points from old pans and fit to new.


 Seat frames added, cleaned up with a coat of zinc.


RHD pedal cluster refurbished and trial fitted.


Seats trial fitted.


No delaying the next job, cleam off the black paint from the pan halves ready for paint.


6hrs of grinding later, the floor pan halves are bare metal on one side.  I decided to zinc coat the pan, seam seal and then 3 coats of  black (smooth) hammerite on the inside pan halves.
For all chassis parts exposed to outside, I wanted to try a KBS coating system consisting of a degreaser, rust converter and the paint in silver.

The end result:


Floor pan welding

28th September 2012
This weekend, spent time checking the final fit of the floor pan halves, setting up the welder and punching 6mm holes in the floor pan edge every 1/2" to plug weld.  To ensure a tight fit, I made a wooden prop to press down on the floor pan from the garage roof trusses.


Once both sides were welded, then ground the welds down flat to tidy up.


And sprayed on some zinc spray to keep the rust away.


 Feels like a step forward,  but a long way to go.


Wednesday, 12 September 2012

Cleaned Framehead


12th September 2012
This week I have been slowly stripping the remaining chassis back to bare metal in the evenings.


 I have taken to scraping the underseal off with a wood chisel, and grinding the paint off with a wire wheel.

The finished product looks great, and there is almost no surface rust.

Its been a struggle to find a RHD pedal assembly, but I think I have finally located one with nearly all the parts.

Also ordered a new beetle beam from Volkspares, fully adjustable with trailing arms for £200.  Seemed too good to be true, and amazingly they then informed me there was no stock.

So ordered one from Machine7 instead.  Looks pretty good, but will need to refurb lots from the old beam and fit to this.

Monday, 10 September 2012

Floor pan fitting

9th September 2012
Ok, so we continued and removed all of the old floor pan halves.


Things are looking pretty good.


Now to start fitting the pans.
The new floor pan halves come slightly wider than required and need to be cut down to fit.


The best way to do this is to clamp the front and back of the pan the same distance from the finished position.  Next cut a small block of wood exactly to this size.  Then you can mark a line all the way along the tunnel to cut too.


I used a thin blade in an angle grinder to cut, and the pans fit perfectly.


 The finish pans laid in place.  A very good fit, and it took less than an hour to cut both to fit.
Before we weld these in place, there a few jobs to complete:

  • Cut new pedal assembly hole to convert to RHD
  • Cut new master cylinder hole to allow conversion to RHD
  • Remove front beam
  • Remove rear axles and gearbox
  • Remove old under seal etc from whats left of the chassis
Leaving the pan halves off means we can lift the tunnel onto some tressels and roll it over to work on the underside easily.

If you have a friend to help, the front beam can come off by removing the 4 mounting bolts.  We left everthing else on, even the wheels.


Unfortunately, the beam has seen better days.  Lots of dodgy welding all over it.  Looks like this will be scrap.


Removing the gearbox and axles is a little more complicated, but not much.  Remove 3 bolts each side which bolt the spring plates to the axles, remove to bolts holding the gearbox to the chassis, undo the gearstick shaft coupling, unbolt the shocks.

All done.


Sunday, 9 September 2012

Floor Pan halves removal

6th September 2012
Ok, so ordered the new floor pan halves from Status VW in the UK.  Arrived the other day

Couldn't work out the best way to drill out the spot welds, so thought I'd try HSS metal drill bits on the seat runners. First job, clean off the paint to see the spot welds.  If you have a thick strip of seam sealant, chances are its hard so knock it off with a hammer and chisel. I went for a sanding disc as per the pictures to try and remove the minimum amount of metal possible.

So you should see something like this when you have run the sanding disc along.  Doesn't take many seconds.  The black dots are the factory spot welds that need drilling out (although occasionally there are ones that you can't see)
 
 
Starting with a 2.5mm drill, drill into the spot welds.  For the seat runners, I was happy to drill al the way through as the pan halves would be thrown out.  After drilling the hole, I then increased the size in 1mm ish stages up to 6mm.

This allowed for the frame to be lifted from the pan as shown

Although this worked, it takes alot of time and you can see that the frame will need remedial work to straighten out.
 So, I didn't want the hassle when doing both pan halves.  Looked around, and found these spot weld drill bits.  They were around £6 each so I ordered 2 (6mm size).


Armed with these, we took to the first floor pan half.


To make life easier, we used a reciprocating saw with a metal blade to cut around the pan and remove a large section.  Care should be taken to not cut through the lip we want to retain, this is quite tricky near the seat runners (next time we will remove these first).


We started removing spot welds across the rear frame.  Once we drilled some out we used a flat blade screw driver to help spilt the pan from the frame.


Continue until all the old pan is removed.

Wednesday, 29 August 2012

The Hidden Rot

27th August
So, as planned we got on with splitting the floor pan from the body. 

Prior to purchasing the car, we checked the body was bolted down.  Unfortunately we checked under the back seat, and in the front up to the frame head but not down the length as the floor pan looked really good.

When we came to remove the body and found half of the bolts missing, we realised after much debate and investigation that someone had gone to the effort of making up repair panels that covered the original bolts (including all the rust and rot), and welded these to the outer cills.

These had to be cut out to release the body from the pan, taking almost 2 days to complete.

If you need some tips/details on how to split the car, check out the you-tube clips from this company http://www.swrnc.com

Here's a view of the newly removed floor pan:


The main floor pan itself is not in bad condition.  If this were a beetle, suitable small repair panels could be found and used.   The next photos show the rear corners, they are bad, but the main frame head is still good.


Front corners are also poor.


And some dodgy looking repair panels over the front frame head.


Decision time......for ease and quality, I think we will purchase replacement pan halves (£140 each).

I will post photos of the heater channels and cills when I get over the shock of how poor they are, and how much the replacement parts will be.