Thursday, 28 August 2014

Workshop Move and front inner wing rework

Got tired of working in cramp conditions, so the wife finally agreed to let me build a new workshop as I have been working in a small garage with the floor pan rolled in under the body being held up by scaffolding.


It took a couple of weeks to build, but here is a shot of the inside.  I took the opportunity to make a rolling frame to bolt underneath as well.


As you can see from the photo above, I have removed one of the front wings.  These were fitted by someone brand new, but there was a lot of bad welding with plates tacked over rust.


Its time to get cutting all the rubbish away and fit new.


Monday, 26 May 2014

RHD Dashboard Conversion Part 3


What to do with that large hole where the Gauges used to be.

I suppose a glove box would be nice.  So as I have an old beetle that will never see the road again, I thought maybe I could graft its glove box in.

Unfortunately, the Beetle glove box is about 25mm too deep, so not wanting to be beaten, I decided to section the glove box door and frame and weld them back together to fit.


Here is the slimmed down beetle glove box clamped in place.

 Unfortunately, I forgot to take photos of the glove box door as I cut it down to size.  This is a little tricky but does butt weld together very nicely.


Then I used the dash top section from the RH side to fill the top hole.


Not the best photo, but you can see that we now have a glove box.

RHD Dashboard Conversion Part 2

With the Steering wheel in place, I trial fitted the gauge panel in place.  The brow of the panel has to be removed and  the angle reversed to fit the opposite side, but is a good fit.


Next job to make and fit small plates to fill all of the holes.  At this point I thought, maybe making an all metal dash wasn't the best idea.


However, with a huge amount of patience it is possible to get an all metal dash.  Hopefully with a little smoothing a primer....


Getting there.  Next job to make a glove box from a RHD Beetle.

Sunday, 7 July 2013

RHD Dashboard Conversion Part 1

I decided it was time to tackle the tricky job of converting the ghia dashboard from LHD to RHD.  The panel in front of the pedals has the pressing in place that helps determine the correct positioning for the steering column hole to connect to the steering box.
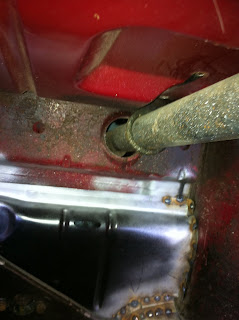


Here you can see the new hole cut and the steering column checked for fit.  I will need to place a small tube section through as per the original.


Here is the steering column clamped in place in front of the original glove box.  I am currently planning to move the gauges section of the dashboard over in a separate section to the steering column mounting section.


Here is the hole left in the dashboard with the gauge and steering column mounting point removed.


The mounting plate for the steering column is not fitted square, so I drilled out the spot welds and reversed the offset to suit RHD.

Holding this piece up under the dash, a hole was marked and cut to allow this piece to be welded in to place.


Here is the plate tacked in place and the steering column mounted to check the fit.


View of the panel from under the bonnet.

Next Job to fit the gauge panel in place.


Monday, 1 July 2013

Front Bulkhead Panel Replacement

29th June 2013

 
Although the front bulkhead panel in front of the pedals looks pretty good from the inside, it did have some repair panels fitted to the corners where it meets the heater channels.

The under side edge that meets the floor pan has substantial rot.


 But the outside panel has a lot of rot. This was probably partly due to a bad earlier repair.


I bought a replacement short panel for a beetle as these are basically the same, but as it was a cheap one it needs some work to fit well.


Carefully exposing and drilling out the spot welds on the inside of the panel.  It provide to be difficult on the outer edges where the panel meets the inner wing.


To ensure a good fit, I bolted the floor pan back up to the body. 


Here is the new panel fitted and tacked in place.


Biggest problem on fitting the panel to the Ghia is that it doesn't actually reach the heater channel.  I will make a small panel and spot weld to both following the contours of the channel.


Sunday, 23 June 2013

Heater Channel Replacement Part 2

22nd June 2013

The replacement heater channels are a pretty good fit.  I have decided to punch holes and do plug welds along the bottom and top edges.


Here's a shot of the channel under the rear seat.  Note the top edge of the outer sill here that was not welded back to the heater channel when the sill was replaced.


Forgot to take photos during the welding stage, but here is the passenger side channel completed.  Just need to dress down the welds along the door edge. 


This is the outside edge of the sill.  There was a 10mm gap along this edge that needed clamping together as I welded. 


Should get a quick trial fit of the body on the floor in the week just to make sure everything is still lining up correctly.


Heater Channel Replacement

16th June 2013

Its been a while since my last post.  The weather has delayed me as I have to push the floor pan out of the garage to work on the body.


The heather channels on my Ghia look pretty good from the outside.


 But when you take a look underneath....

The rot was hidden by a repair that even covered the bolts.  You can see that the outer sill and strength insert had already been replaced at some point.


The passenger side heather channel was no better.

 
The next photos show the current position with the channel cut away.  The spot welds along the top of the channel were carefully cut away, and the bottom edge of the outer sill split from the spot welds as well.


I think I was lucky that the outer sill was quite new, lets hope its in the right place.


Next I will prep for the fitting of the new heater channels by cleaning all areas to be welded and giving a coat of weld thru zinc primer.

I am going to clamp the channels in place and then bolt them to the pan to make sure it all fits.